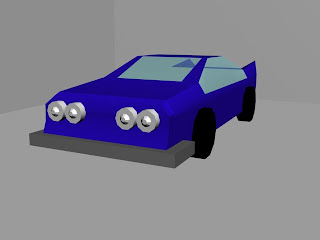
 This is the final design of the car I made in 3D studio max. It was created out of nothing but a simple box from standard primitives. What I did with that box was convert it into an editable mesh and then with the vertex tool, I dragged the two top middle vertexes and pulled them up to shape a roof for my car. After that I got the two top vertexes on the far left and pulled them down to create a bonnet.I then dragged the top two vertexes on the back to make the back of the car.
 I then used the edge tool and dragged the edges of the top centre inward and did the same to make the other side. I dragged the edges of both the bonnet and back of the car to make it look more "car shaped".
I then shaped the front of the car to my liking with the polygon tool and then for the bumper I used the extrude tool and pulled it out. for the car I played around with what I liked, which ended up with the two ends sticking up.
Next what I did was create the lights, to do this I made a cylinder then extruded the centre of the cylinder outward, re sized it then continued doing that until it looked curved. I then pushed it back by resizing it then placed it on the front of the car, which I then duplicated it another 3 times to have 4 lights. For the wheels it was just another cylinder which I placed under the car and duplicated them to make the wheels.
Finally for the colours I pressed the M key and changed the Ambient to black then checked the "show standard map in view port" button which looks like a blue and white cube, with that I dragged the sphere at the top and dropped it onto my wheels and it turned them black! For the rest of the colour what I did was, I clicked on the "standard" box and then selected Multi/Sub object and select the keep materials when the pop up came. next I set the number of materials to 3, named my first material to Glass, 2nd to body and 3rd to Chrome. for the glass I changed it to a light blue and lowered the opacity a little then clicked on "go to parent" then selected on the body, for the body I selected the arrow next to binn and selected metal, I then chose my colour which was blue and then I changed the specular level to around 20 and the glossiness to about 20. when I was happy with that I did the same with chrome: metal, change specular level and glossiness but made it grey. When I was done I made sure I had checked the "Show standard map in view port" button and then dragged it onto my car which didn't go in the right places. To fix that I had to select each bit of the car with the polygon and then change its ID to the correct colour (Glass being 1, body 2, chrome 3)
No comments:
Post a Comment